Saturday, September 29, 2012

Distress Ink / Foam Blending Pad Storage

If you are like me, I hate throwing away or washing the foam blending pads. I kept looking for away to store them. Nothing I found worked for me, so I came up with my own storage solution. This is the revised version, the prototype wasn't as pretty. 
Several people have asked me about this, so I decided to turn it into my first tutorial.
I started with an 8 1/2" by 11" white cardstock paper and drew vertical lines for the velcro strips at 7/8", 3 5/8", 7 5/8"  and at 1 3/4", 2 3/4", 4 1/2", 6 3/4" for foam pads. I also drew horizontal line starting from the top every 1 1/4" This created guidelines for the placement of the label stickers and the foam pads. Repeat on the back side. You have some extra space on the back.

Next I downloaded the Distress Ink labels from the Ranger website (click here). Using the guidelines, I placed the stickers on the cardstock chart by color families, adding in the seasonal colors.


Then I laminated the sheet and added rough strips of velcro (I cut the strips in half to less)  on the lines at  7/8", 3 5/8", 7 5/8" .


Now the fun part. I added the foam pads to the laminated sheet. I used the pencil guidelines. To protect it when traveling, I placed it inside a plastic paper storage pouch.


Saturday, September 22, 2012

September 2012 Tag


 I'm so excited about how my tag turned out this month. I even turned it into cards for the men in my life.

I didn't have the small typewriter, so I have had a great idea....
I used the larger die and cut it out of shrink plastic. I inked it with pitch black alcohol ink and the silver metallic additive. After shrinking it I added foil tape to the back.....perfect.
Here is the paper cut of the die and the finished shrink plastic typewriter.

  Then I made cards for both my husband and my dad. It technique was perfect for my dad who was a sheet metal work. I hope he will like it (I can show it because he doesn't use the computer).


Thursday, September 20, 2012

Connie's Totally Terrific Chunky Tags

Check out this Totally Terrific Tag. 

Learn some of Tim Holtz's techniques to make this tag.


Connie has pulled out all the stops on these. She will teach some of her favorite techniques and designs in this last Totally Terrific Tags class.


This tag has a new fun technique for making the snow on the branches.


What a fun way to use Authentique Paper's Curiosity line - learning.


 Learn how to use specialty stamping paper.


Connie's Totally Terrific Chunky Tags   September 29 1pm-3pm
Call or stop by Cafe to sign-up

Tuesday, September 11, 2012

Altered Fall Project

It's beginning to look like fall inside and out. 

Come join us and create this spook-tacular witch's hat just in time for Halloween.


Check out the details of the spider web....


and the ghosts

Altered Fall Project $22

Call or stop by Cafe Crop to sign-up.

Saturday, September 8, 2012

School Days Mini Album

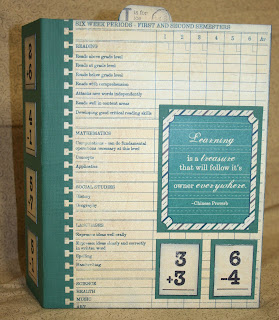
Believe it or not, back to school time is here. Looking for a way to preserve those school days memories. Check out the mini album Connie designed using the Authenique's Curiosity papers. 


                 It is loaded with tags and pockets.

 School Days Mini Album  $ 45

This is a multi-part class and may run longer than our typical classes.
Please note the dates and times.  You must attend each part of the class to complete the album.
Part 1:
  • Tuesday, September 11, 11 AM - 1 PM
  • Wednesday, September 12, 6 PM - 8 PM
Part 2:
  • Tuesday, September 18, 11 AM - 1 PM
  • Wednesday, September 19, 6 PM - 8 PM